
Changing Zetec Camshafts
:: Technical :: Tech Guides
Page 1 of 1

Changing Zetec Camshafts
![]() by Davespages Mon Feb 11, 2008 7:11 am
by Davespages Mon Feb 11, 2008 7:11 am
The Aim
The aim of this guide is to give a step by step procedure so anybody who owns a few tools can change the camshafts in their zetec engine.
- The Guide is Generic so Applies to Fiesta/Escort/Mondeo Silvertop engines.
- Dependant on the vehicle, you may have to remove other things such as Drivers Front wheel, Arch Liners or Fluid bottles to gain access to the cam belt/tension-er.
Tools Needed for the Camshaft removal and refitting.
(Other tools might be needed if other vehicle specific bits need removing for access)
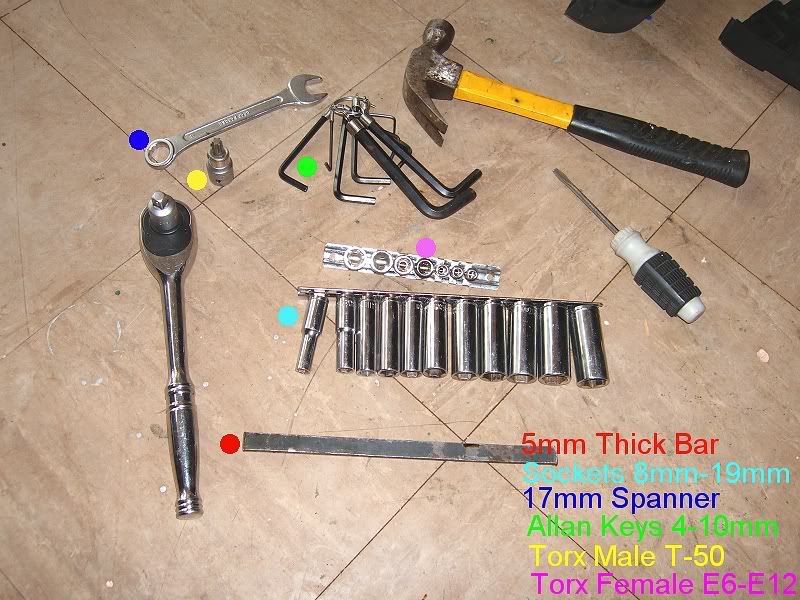
- 5mm Thick Bar (Camshaft timing)
- 17mm Spanner (Cam-belt tension-er bolt)
- Torx Bit Male T-50 (Cam-belt tension-er bolt)
- Allan Key 6mm (Cam-belt tension-er)
- Various Sockets. 8mm, 10mm and 18mm.
- Torx Female Socket E-10 (Cam Bearing Caps)
Time
With the engine on the floor, the procedure takes approximately 30 minutes.
With the engine in the vehicle the time can vary due to the location of covers that block access to the cam-belt assembly.
Escort: The first time i did this it took 3 hours from start to finish. I've done it dozens of times now and the quickest i've managed is an hour and a half.
The reason behind the extra 1-2 hours is due to the removal of parts that restrict access to the cam belt assembly or are generally in the way.
- Drivers front wheel off, Inner Arch Lining Removed (Allows access through the wing to the cam belt cover)
- Lower Crank Pulley Cover (Allows access to the crank pulley)
- Power Steering Fluid Reservoir (Removal gives space to work between the wing and the cam belt)
- Coolant Reservoir (As above for PAS reservoir))
- Air Box/Inlet Pipe (Allows removal of HT leads)
- HT Leads (Allows removal of the Camshaft cover - Often referred to as the "rocker cover")
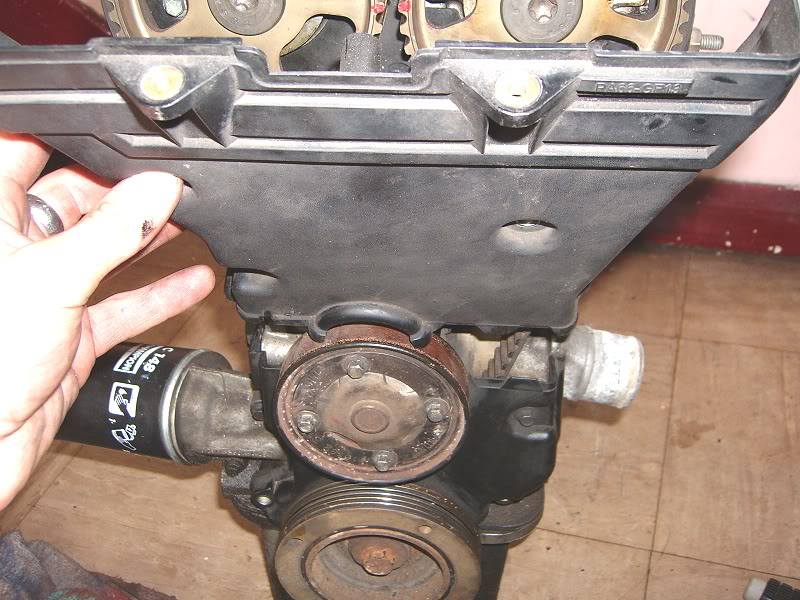
Ignore the Arrows for the time being, the point of the picture below is to show the space freed up by removing the arch liner and PAS/Coolant tanks.
You can clearly see the improved access to the cam belt assembly through the wing.

**********************************************************
As mentioned earlier in this guide, I had my old Zetec engine on the floor so just picture all this in your engine bay.
- Remove the Camshaft Pulley Cover (2x 8mm Bolts)
- Remove the Cam Belt cover (2x 8mm Bolts and an 8mm nut on a half thread bolt... both nut and bolt need removing using an 8mm socket. This cover requires pulling up and away from the engine so that the bottom lip of the cover pulls out from the water pump pulley)

You will now be left with this...
Using a good Ratchet (Preferably 1/2" drive) and an 18mm socket, turn the engine over clockwise untill its TDC (Top Dead Centre)
This is achieved by turning the crank pulley clockwise untill the SECOND notch on the crank pulley lines up with the diagonal timing mark on the sump.

With the Engine at TDC, you can now remove the Camshaft Cover (Referred to as the "rocker cover") 10x 10mm bolts.

Cover Removed

Using the 30cm long, 5mm Thick Bar (5mm thickness is imperitive for the camshaft dowl grooves) slide it in the timing grooves, it might need tapping it but should go in, this is the basis for timing the camshafts up.

Before you continue, you can now remove the 5mm thick bar.
Camshaft Removed

Fit the Replacement Camshaft and lubricate (with fresh engine oil) where the bearing caps sit.
(This provides lubrication for the first few moments before oil is circulated up from the block)

- Re-fit the bearing caps IN ORDER.
- Tighten the bearing caps down using the tightening sequence below.

Note: Don't over tighten them as i have sheared a bolt in the head before... not good at all!

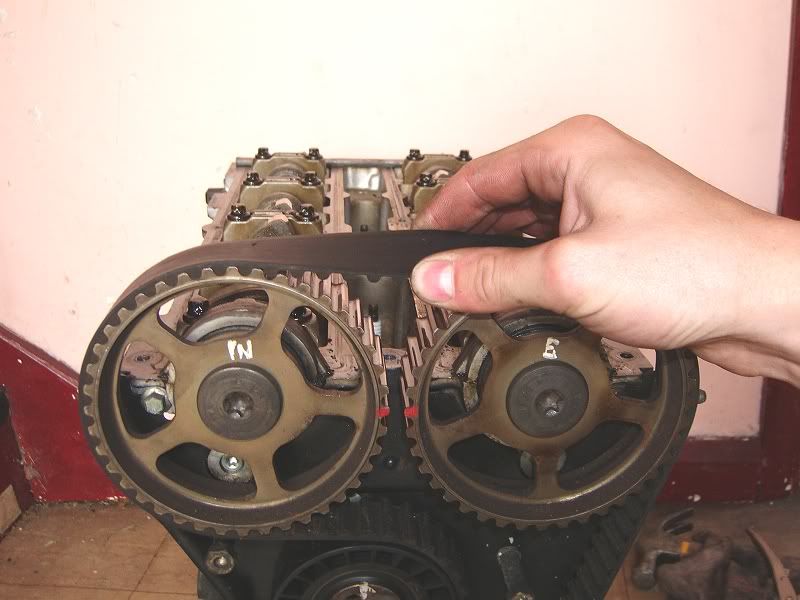
Now you can start on the Inlet Camshaft using the same procedure as the Exhaust Camshaft.

You will now notice that the cams are sitting as they want - not timed up (This is due to the valve springs pushing up the hydraulic tappets and subsequently the cam's on the camshaft and turning the shaft a bit)

So turn the Camshaft pullies to align the dowl grooves up with the head face and slot (or tap) in the 5mm thick bar to get the cams timed up.

You can now slip the Cambelt back on the pullies.
(In this exercise i replaced the cams back to standard cams, you can see that with the engine at TDC and cams timed with eachother that the original timing marks made by a previous mechanic on the pullies line up which confirms the engines timing being spot on)
Using the 6mm Allen Key Tension the belt by moving the Tensioner and then tighten the bolt using a 17mm Spanner or the T50 Torx Bit.

Getting the tension on the belt is crucial, get it wrong and it could spell the end for the engine.
- Too Loose... Belt slips off.. Valve/Piston contact.
- Too Tight, Premature wear to belt.. stretching... Whining noise from belt... Reduced life of the belt
There should be no slack on the belt.
Look at the photo's below, they show the ammount of "twist" the belt should have.
- To much twist - TOO LOOSE
- Very Diifficult to twist - TOO TIGHT.

45 Degree Twist either way is about right.
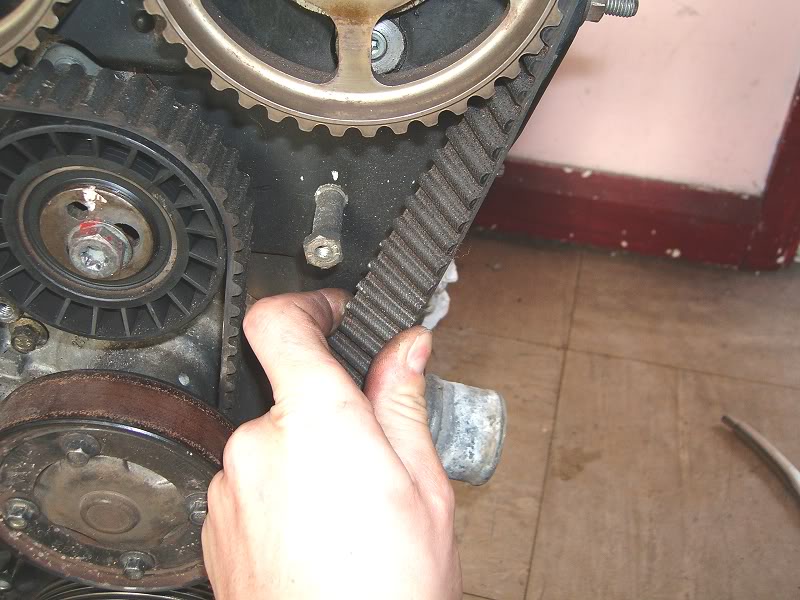
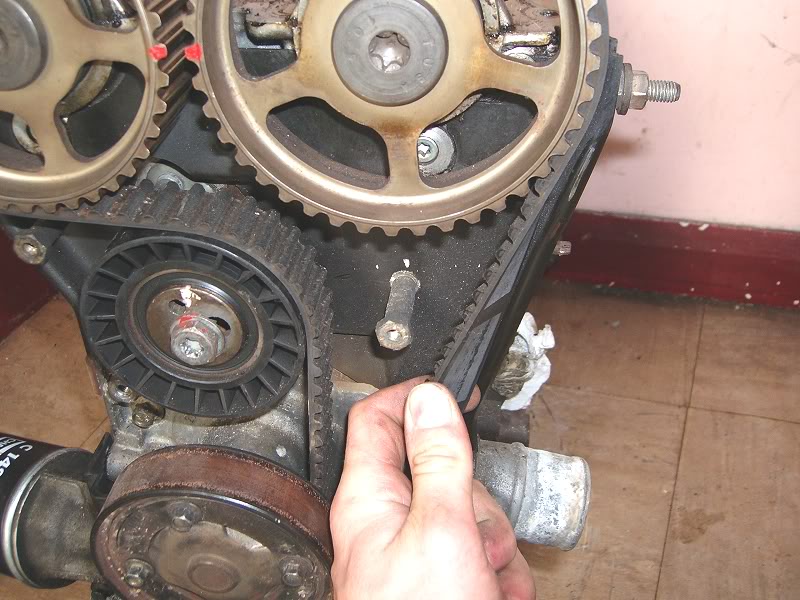
There should be virtually no twist between the crank and the tensioner....

If you are happy with the tension you can proceed, else slacken the tension and re-tension again.
- Remove the 5mm thick bar from the Camshafts.
- Using the 18mm Socket, Turn the engine over clockwise by the Crank Pulley and give the crank 2-3 full rotations.
(This is to make sure there is no nasty supprises like Valve/Piston Contact)
- Fit the "Rocker Cover" back on using a 10mm socket and dont overtighten the 10 Bolts.
If you are happy with this (And only if) briefly turn the engine over to make sure it starts and runs fine.
- Refit the Cam Belt Cover (This is fiddly to get over the Water Pump pulley but it will go back, try pushing it down at an angle) and tighten the 3x 8mm bolts
- Refit the Camshaft Pulley Cover, 2x 8mm bolts.
- Refit HT leads
As far as the "Generic" Guide Goes... this is it, done and Dusted.
If you removed other things for easy access like air box, PAS/Coolant Resivoirs and Wheel Arch Liner Etc then these need refitting using the tools you used to remove them...
Disclaimer: Neither Ford-Force or any of its members will accept liability for any possible damage caused by carrying out this guide, if you are unsure of anything, get a fully qualified mechanic to help.
The aim of this guide is to give a step by step procedure so anybody who owns a few tools can change the camshafts in their zetec engine.
- The Guide is Generic so Applies to Fiesta/Escort/Mondeo Silvertop engines.
- Dependant on the vehicle, you may have to remove other things such as Drivers Front wheel, Arch Liners or Fluid bottles to gain access to the cam belt/tension-er.
Tools Needed for the Camshaft removal and refitting.
(Other tools might be needed if other vehicle specific bits need removing for access)
- 5mm Thick Bar (Camshaft timing)
- 17mm Spanner (Cam-belt tension-er bolt)
- Torx Bit Male T-50 (Cam-belt tension-er bolt)
- Allan Key 6mm (Cam-belt tension-er)
- Various Sockets. 8mm, 10mm and 18mm.
- Torx Female Socket E-10 (Cam Bearing Caps)
Time
With the engine on the floor, the procedure takes approximately 30 minutes.
With the engine in the vehicle the time can vary due to the location of covers that block access to the cam-belt assembly.
Escort: The first time i did this it took 3 hours from start to finish. I've done it dozens of times now and the quickest i've managed is an hour and a half.
The reason behind the extra 1-2 hours is due to the removal of parts that restrict access to the cam belt assembly or are generally in the way.
- Drivers front wheel off, Inner Arch Lining Removed (Allows access through the wing to the cam belt cover)
- Lower Crank Pulley Cover (Allows access to the crank pulley)
- Power Steering Fluid Reservoir (Removal gives space to work between the wing and the cam belt)
- Coolant Reservoir (As above for PAS reservoir))
- Air Box/Inlet Pipe (Allows removal of HT leads)
- HT Leads (Allows removal of the Camshaft cover - Often referred to as the "rocker cover")
Ignore the Arrows for the time being, the point of the picture below is to show the space freed up by removing the arch liner and PAS/Coolant tanks.
You can clearly see the improved access to the cam belt assembly through the wing.
**********************************************************
As mentioned earlier in this guide, I had my old Zetec engine on the floor so just picture all this in your engine bay.
- Remove the Camshaft Pulley Cover (2x 8mm Bolts)
- Remove the Cam Belt cover (2x 8mm Bolts and an 8mm nut on a half thread bolt... both nut and bolt need removing using an 8mm socket. This cover requires pulling up and away from the engine so that the bottom lip of the cover pulls out from the water pump pulley)
You will now be left with this...
Using a good Ratchet (Preferably 1/2" drive) and an 18mm socket, turn the engine over clockwise untill its TDC (Top Dead Centre)
This is achieved by turning the crank pulley clockwise untill the SECOND notch on the crank pulley lines up with the diagonal timing mark on the sump.
With the Engine at TDC, you can now remove the Camshaft Cover (Referred to as the "rocker cover") 10x 10mm bolts.
Cover Removed
Using the 30cm long, 5mm Thick Bar (5mm thickness is imperitive for the camshaft dowl grooves) slide it in the timing grooves, it might need tapping it but should go in, this is the basis for timing the camshafts up.
Before you continue, you can now remove the 5mm thick bar.
Camshaft Removed
Fit the Replacement Camshaft and lubricate (with fresh engine oil) where the bearing caps sit.
(This provides lubrication for the first few moments before oil is circulated up from the block)
- Re-fit the bearing caps IN ORDER.
- Tighten the bearing caps down using the tightening sequence below.
Note: Don't over tighten them as i have sheared a bolt in the head before... not good at all!
Now you can start on the Inlet Camshaft using the same procedure as the Exhaust Camshaft.
You will now notice that the cams are sitting as they want - not timed up (This is due to the valve springs pushing up the hydraulic tappets and subsequently the cam's on the camshaft and turning the shaft a bit)
So turn the Camshaft pullies to align the dowl grooves up with the head face and slot (or tap) in the 5mm thick bar to get the cams timed up.
You can now slip the Cambelt back on the pullies.
(In this exercise i replaced the cams back to standard cams, you can see that with the engine at TDC and cams timed with eachother that the original timing marks made by a previous mechanic on the pullies line up which confirms the engines timing being spot on)
Using the 6mm Allen Key Tension the belt by moving the Tensioner and then tighten the bolt using a 17mm Spanner or the T50 Torx Bit.
Getting the tension on the belt is crucial, get it wrong and it could spell the end for the engine.
- Too Loose... Belt slips off.. Valve/Piston contact.
- Too Tight, Premature wear to belt.. stretching... Whining noise from belt... Reduced life of the belt
There should be no slack on the belt.
Look at the photo's below, they show the ammount of "twist" the belt should have.
- To much twist - TOO LOOSE
- Very Diifficult to twist - TOO TIGHT.
45 Degree Twist either way is about right.
There should be virtually no twist between the crank and the tensioner....
If you are happy with the tension you can proceed, else slacken the tension and re-tension again.
- Remove the 5mm thick bar from the Camshafts.
- Using the 18mm Socket, Turn the engine over clockwise by the Crank Pulley and give the crank 2-3 full rotations.
(This is to make sure there is no nasty supprises like Valve/Piston Contact)
- Fit the "Rocker Cover" back on using a 10mm socket and dont overtighten the 10 Bolts.
If you are happy with this (And only if) briefly turn the engine over to make sure it starts and runs fine.
- Refit the Cam Belt Cover (This is fiddly to get over the Water Pump pulley but it will go back, try pushing it down at an angle) and tighten the 3x 8mm bolts
- Refit the Camshaft Pulley Cover, 2x 8mm bolts.
- Refit HT leads
As far as the "Generic" Guide Goes... this is it, done and Dusted.
If you removed other things for easy access like air box, PAS/Coolant Resivoirs and Wheel Arch Liner Etc then these need refitting using the tools you used to remove them...
Disclaimer: Neither Ford-Force or any of its members will accept liability for any possible damage caused by carrying out this guide, if you are unsure of anything, get a fully qualified mechanic to help.

Davespages- Admin
- Posts : 158
Join date : 2007-12-09
» Changing Zetec Valve stem seals
» Kent Camshafts,
» Zetec ECU Pin-Outs
» 2.0 Zetec Preparation
» Zetec MAF sensor Dependance
» Kent Camshafts,
» Zetec ECU Pin-Outs
» 2.0 Zetec Preparation
» Zetec MAF sensor Dependance
:: Technical :: Tech Guides
Page 1 of 1
Permissions in this forum:
You cannot reply to topics in this forum