
Escort 1.6/1.8 to Mondeo 1.8/2.0 ECU Hack
:: Technical :: Tech Guides
Page 1 of 1

Escort 1.6/1.8 to Mondeo 1.8/2.0 ECU Hack
![]() by Davespages Mon Feb 11, 2008 7:07 am
by Davespages Mon Feb 11, 2008 7:07 am
This guide is aimed at those who have just changed from a 1.6 or 1.8 Zetec (Silver top) up to a 2.0 Silver top zetec as found in the mondeo's.
Legal Disclaimer: Davespages.co.uk will not accept liability for any loss or damage caused by actioning this guide.
A little information is needed from your car before you consider if this guide is for you.
Your current ECU must meet the following criteria...
Run EEC-IV specification management
(Only the very very late escorts were gifted with EEC-V which can be remapped so you should be ok on this one)
Have the 60 pin multi-plug connector
(Again only EEC-IV had this, EEC-V had more pins)
Have INTERNAL EDIS
(The ignition control system, Around 1993 ford moved the EDIS unit from the passenger wing into the ECU)
Have Internal PATS
(Passive Anti Theft System - Immobiliser. Ford introduced the PATS immobiliser in 1992, this was an external to the ecu, later [about 1993] ford moved this into the ECU as well)
External PATS shouldn't cause an issue with ECU's
*******************************************
Now that you are up to speed with what you have...
The reason we are here...
2.0 Mondeo ECU (MANUAL) with Internal EDIS but NO PATS.
Despite the rumours, ALL manual 2.0 Mondeo ecu's had INTERNAL EDIS.
Pats was introduced in late 1994 on the Mondeo's so your looking at 1993/1994 mondeo's for a donor ECU.
There are 3 choices of 2.0 ECU codes that you can use for this guide, all other ECU's have PATS or were from an automatic.
(Auto ecu's are useless as they have the autobox kick down mapped too and this is no use to you with a manual gearbox.)
2.0 Manual NON-PATS ecu codes.
DEEP
93BB12A650EF
DESK
93BB12A650ED
DEWY
93BB12A650EE
-----------------------------------------------------
Now that you have the ECU here's what your going to need for the ecu swap.
10mm Spanner/Socket
Small thin flat screw driver
Masking tape
Pen
This guide Printed out....
Unfortunately the ecu's are not a straight swap and as such wires need to be moved about to make the ECU work.
BEFORE ANY WIRES ARE MOVED, LABEL ALL THE WIRES HIGHLIGHTED BELOW USING MASKING TAPE WITH THIER ORIGINAL PIN LOCATION, this way if you make a mistake in moving a wire, you can back track and start again.
Right... The whole ecu swap took me an hour, however i got a wire in the wrong hole so had running issues. I was able to sort it quickly tho, this RE-ENFORCES the importance of labelling the wires up (I cant stress this enough)
Firstly you need to disconnect the battery (Safety First)
Then you need to remove the ECU (if you have not already done so in the past)
In escorts its located in the Passenger foot well.
Unscrew the retaining screw in the Kick panel cowling and the panel should pull off.
This will reveal your ECU in its metal case.
You will notice that it may (or may not) have a brass rivet holding the ecu cage in place.
If it does, this needs to be drilled out so you can remove the ECU cage and thus the ECU.

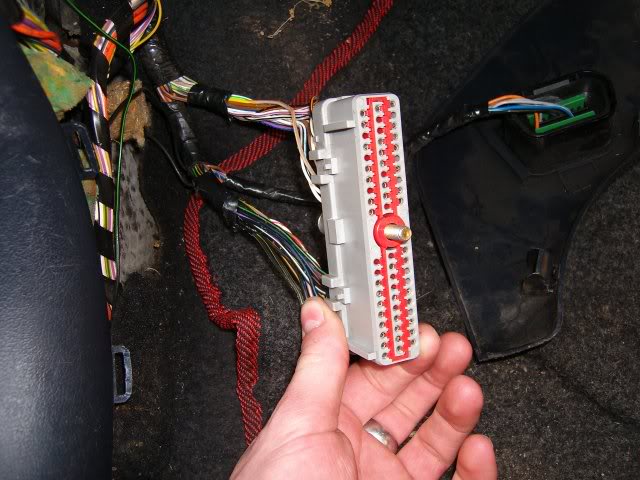
Now the cage is free, It will pull down and away from the ecu. Release the ECU from the Two retaining clips and then you can undo the ECU from its multiplug connector using the 10mm Spanner/Socket.

ECU removed from Multi-plug connector.

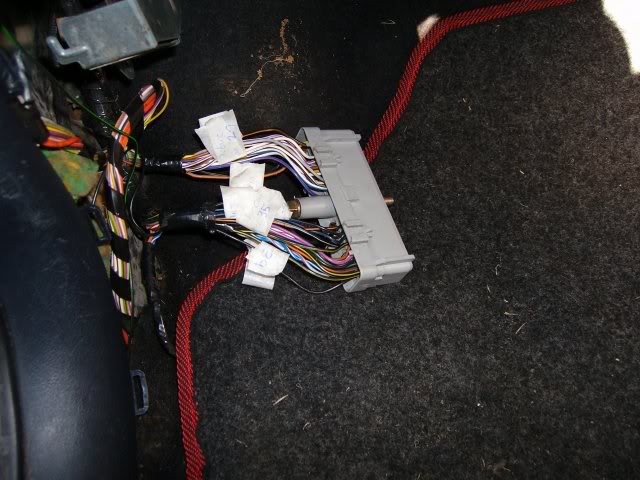
In order to label the wires up, you need to strip away a little of the insulating tape from the loom, this gives about 3-4 inches of wire free for each pin.
*********************************************
Now then... If you look on the underside of the multiplug, where the wires go in... you will see the bottom row is labeled 1-20 and the top row labelled 41-60 (The middle row is not labelled but you can work it out... left to right... 21-40)
On each wire to be Labelled, I suggest you write "Was Pin ** " on the masking tape...
So...
Fuel pump inhibitor wire
pin no 53
Octane adjustment wire
pin no 29
Injector wires
pin no 12
pin no 15
pin no 42
pin no 54
air-con wire (i don't have air con but this needs doing regardless of having air con or not)
pin no 35
starter inhibit relay wire
pin no 32
PATS wires
pin no 39
pin no 22 (you may not have this wire as i didn't but haynes suggests some models did)
You should now have 9 wires that are labelled up with masking tape (or 10 if you have a pin 22 wire)
****************************************************
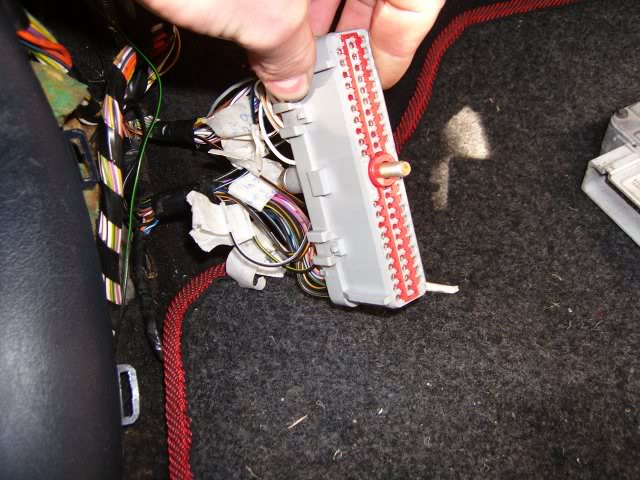
Inside the ECU multiplug you can see a red plastic insert.
This needs to come out. It can be prized out using a thin flat screwdriver on each end... there is a little gap in which to prize it out.
When its removed, you will be able to see small plastic clips that retain the pins into position.
Sliding the thin flat screwdriver between the pin and the clip will release said pin, then it can be pulled out the bottom of the multi-plug connector.
Ok, I've organised this in an order so that as little wires are removed from the plug at any one time...
---------------------------------------------
PATS WIRES
Remove PIN 39 (And tape up the pin so it doesn't touch anything)
Remove PIN 22 (Again, you may not have this but if you do, tape it up)
----------------------------------------------
AIR CON WIRE
Remove PIN 35 (This will get re-located shortly)
----------------------------------------------
FUEL PUMP WIRE
Remove Pin 53 and push into Hole 22
----------------------------------------------
INJECTOR WIRES
Injector. 1 - PIN 15, remove and refit to hole 51
Injector. 2 - PIN 12, remove and refit to hole 52
Injector. 3 - PIN 54, remove and refit to hole 39
Injector. 4 - PIN 42, remove and refit to hole 35
----------------------------------------------
OCTANE ADJUSTMENT WIRE
Remove Pin 29 and refit to hole 42
----------------------------------------------
STARTER INHIBIT RELAY
Remove Pin 32 and this needs to be permanently Earthed.
----------------------------------------------
AIR CON WIRE
This should be labelled PIN 35, Now fit this into Hole 54
----------------------------------------------
The Pin swap is now complete.
You will notice that i used pin numbers, not wire colours... ford have been known to vary the wire colours from vehicle to vehicle but the pin configuration is correct.
So You will be left with the Old PATS wires (Pin 39 and if you had it, Pin 22)
These must be taped up safe into the loom and must never touch an earth or live (or each other for that matter)
The Starter inhibit relay wire is earthed.
ALL other wires that you removed should now be refitted... If not... you need to back track this guide and check which one(s) you missed out.
DO NOT REMOVE THE MASKING TAPE THAT YOU USED TO LABEL THE WIRES, THIS IS NEEDED SHOULD THERE BE A PROBLEM
Replace the red plastic shield into the multiplug connector.
All that is left to do now is to connect the 2.0 ECU by plugging it into the multiplug and tightening up the 10mm bolt.
Then re-connect the battery.
If you have followed this Guide Correctly, The engine will fire first time.
(Idle may be slightly erratic while the ECU learns base idle but after a few minutes this will settle down)
---------------------------------------------------
If the engine sounds lumpy (running on 3 or less cylinders) and the PATS light in your clock flashes with the revs of the engine... you have one or more injector pins in the wrong hole.
Check back over your labelled wires and the guide to find out what went wrong.
If for any reason the engine does not start...
Does the fuel pump prime (buzz with the ignition on) if not, you need to check the wire that you labelled PIN 53, it SHOULD now be in Hole 22.
Do you have the Starter Inhibit relay to a good earth? Without this, the starter will not engage at all, Test this by running a fresh earth to the wire you labelled PIN 32.
The car should now start without any issues.
If you have any other issues, you need to back track this guide using the labelled wires as reference.
Legal Disclaimer: Davespages.co.uk will not accept liability for any loss or damage caused by actioning this guide.
A little information is needed from your car before you consider if this guide is for you.
Your current ECU must meet the following criteria...
Run EEC-IV specification management
(Only the very very late escorts were gifted with EEC-V which can be remapped so you should be ok on this one)
Have the 60 pin multi-plug connector
(Again only EEC-IV had this, EEC-V had more pins)
Have INTERNAL EDIS
(The ignition control system, Around 1993 ford moved the EDIS unit from the passenger wing into the ECU)
Have Internal PATS
(Passive Anti Theft System - Immobiliser. Ford introduced the PATS immobiliser in 1992, this was an external to the ecu, later [about 1993] ford moved this into the ECU as well)
External PATS shouldn't cause an issue with ECU's
*******************************************
Now that you are up to speed with what you have...
The reason we are here...
2.0 Mondeo ECU (MANUAL) with Internal EDIS but NO PATS.
Despite the rumours, ALL manual 2.0 Mondeo ecu's had INTERNAL EDIS.
Pats was introduced in late 1994 on the Mondeo's so your looking at 1993/1994 mondeo's for a donor ECU.
There are 3 choices of 2.0 ECU codes that you can use for this guide, all other ECU's have PATS or were from an automatic.
(Auto ecu's are useless as they have the autobox kick down mapped too and this is no use to you with a manual gearbox.)
2.0 Manual NON-PATS ecu codes.
DEEP
93BB12A650EF
DESK
93BB12A650ED
DEWY
93BB12A650EE
-----------------------------------------------------
Now that you have the ECU here's what your going to need for the ecu swap.
10mm Spanner/Socket
Small thin flat screw driver
Masking tape
Pen
This guide Printed out....
Unfortunately the ecu's are not a straight swap and as such wires need to be moved about to make the ECU work.
BEFORE ANY WIRES ARE MOVED, LABEL ALL THE WIRES HIGHLIGHTED BELOW USING MASKING TAPE WITH THIER ORIGINAL PIN LOCATION, this way if you make a mistake in moving a wire, you can back track and start again.
Right... The whole ecu swap took me an hour, however i got a wire in the wrong hole so had running issues. I was able to sort it quickly tho, this RE-ENFORCES the importance of labelling the wires up (I cant stress this enough)
Firstly you need to disconnect the battery (Safety First)
Then you need to remove the ECU (if you have not already done so in the past)
In escorts its located in the Passenger foot well.
Unscrew the retaining screw in the Kick panel cowling and the panel should pull off.
This will reveal your ECU in its metal case.
You will notice that it may (or may not) have a brass rivet holding the ecu cage in place.
If it does, this needs to be drilled out so you can remove the ECU cage and thus the ECU.
Now the cage is free, It will pull down and away from the ecu. Release the ECU from the Two retaining clips and then you can undo the ECU from its multiplug connector using the 10mm Spanner/Socket.
ECU removed from Multi-plug connector.
In order to label the wires up, you need to strip away a little of the insulating tape from the loom, this gives about 3-4 inches of wire free for each pin.
*********************************************
Now then... If you look on the underside of the multiplug, where the wires go in... you will see the bottom row is labeled 1-20 and the top row labelled 41-60 (The middle row is not labelled but you can work it out... left to right... 21-40)
On each wire to be Labelled, I suggest you write "Was Pin ** " on the masking tape...
So...
Fuel pump inhibitor wire
pin no 53
Octane adjustment wire
pin no 29
Injector wires
pin no 12
pin no 15
pin no 42
pin no 54
air-con wire (i don't have air con but this needs doing regardless of having air con or not)
pin no 35
starter inhibit relay wire
pin no 32
PATS wires
pin no 39
pin no 22 (you may not have this wire as i didn't but haynes suggests some models did)
You should now have 9 wires that are labelled up with masking tape (or 10 if you have a pin 22 wire)
****************************************************
Inside the ECU multiplug you can see a red plastic insert.
This needs to come out. It can be prized out using a thin flat screwdriver on each end... there is a little gap in which to prize it out.
When its removed, you will be able to see small plastic clips that retain the pins into position.
Sliding the thin flat screwdriver between the pin and the clip will release said pin, then it can be pulled out the bottom of the multi-plug connector.
Ok, I've organised this in an order so that as little wires are removed from the plug at any one time...
---------------------------------------------
PATS WIRES
Remove PIN 39 (And tape up the pin so it doesn't touch anything)
Remove PIN 22 (Again, you may not have this but if you do, tape it up)
----------------------------------------------
AIR CON WIRE
Remove PIN 35 (This will get re-located shortly)
----------------------------------------------
FUEL PUMP WIRE
Remove Pin 53 and push into Hole 22
----------------------------------------------
INJECTOR WIRES
Injector. 1 - PIN 15, remove and refit to hole 51
Injector. 2 - PIN 12, remove and refit to hole 52
Injector. 3 - PIN 54, remove and refit to hole 39
Injector. 4 - PIN 42, remove and refit to hole 35
----------------------------------------------
OCTANE ADJUSTMENT WIRE
Remove Pin 29 and refit to hole 42
----------------------------------------------
STARTER INHIBIT RELAY
Remove Pin 32 and this needs to be permanently Earthed.
----------------------------------------------
AIR CON WIRE
This should be labelled PIN 35, Now fit this into Hole 54
----------------------------------------------
The Pin swap is now complete.
You will notice that i used pin numbers, not wire colours... ford have been known to vary the wire colours from vehicle to vehicle but the pin configuration is correct.
So You will be left with the Old PATS wires (Pin 39 and if you had it, Pin 22)
These must be taped up safe into the loom and must never touch an earth or live (or each other for that matter)
The Starter inhibit relay wire is earthed.
ALL other wires that you removed should now be refitted... If not... you need to back track this guide and check which one(s) you missed out.
DO NOT REMOVE THE MASKING TAPE THAT YOU USED TO LABEL THE WIRES, THIS IS NEEDED SHOULD THERE BE A PROBLEM
Replace the red plastic shield into the multiplug connector.
All that is left to do now is to connect the 2.0 ECU by plugging it into the multiplug and tightening up the 10mm bolt.
Then re-connect the battery.
If you have followed this Guide Correctly, The engine will fire first time.
(Idle may be slightly erratic while the ECU learns base idle but after a few minutes this will settle down)
---------------------------------------------------
If the engine sounds lumpy (running on 3 or less cylinders) and the PATS light in your clock flashes with the revs of the engine... you have one or more injector pins in the wrong hole.
Check back over your labelled wires and the guide to find out what went wrong.
If for any reason the engine does not start...
Does the fuel pump prime (buzz with the ignition on) if not, you need to check the wire that you labelled PIN 53, it SHOULD now be in Hole 22.
Do you have the Starter Inhibit relay to a good earth? Without this, the starter will not engage at all, Test this by running a fresh earth to the wire you labelled PIN 32.
The car should now start without any issues.
If you have any other issues, you need to back track this guide using the labelled wires as reference.

Davespages- Admin
- Posts : 158
Join date : 2007-12-09
» Had to find an emergency replacement for the Mondeo
» leather in my escort
» Escort Mk6 Dial Illumination Modification
» Ford Escort Alarm Fault Finding
» leather in my escort
» Escort Mk6 Dial Illumination Modification
» Ford Escort Alarm Fault Finding
:: Technical :: Tech Guides
Page 1 of 1
Permissions in this forum:
You cannot reply to topics in this forum